
TL;DR
Placing your rig in a closet can dramatically cut noise, but it requires careful placement, proper acoustic dampening, and ventilation. The key is separating sound isolation from absorption and ensuring heat escapes. Done right, a closet setup offers a quiet, flexible solution for high-performance workstations.
Ever wondered how some voice-over artists and AI researchers turn a tiny closet into a quiet, professional-sounding studio? It’s all about smart placement, not just stuffing foam everywhere. The real magic happens when you separate noise reduction from soundproofing, and leverage good airflow to keep your hardware cool. This isn’t just about making noise disappear—it’s about making the space work for you without overheating or creating a boxy sound.
In this guide, you’ll learn how to position your gear, choose the right materials, and design a closet setup that balances quiet operation with effective ventilation. Whether you’re recording vocals or running a high-power AI rig, understanding these principles will help you get the most out of your tiny space while keeping noise and heat in check.
Acoustic dampening
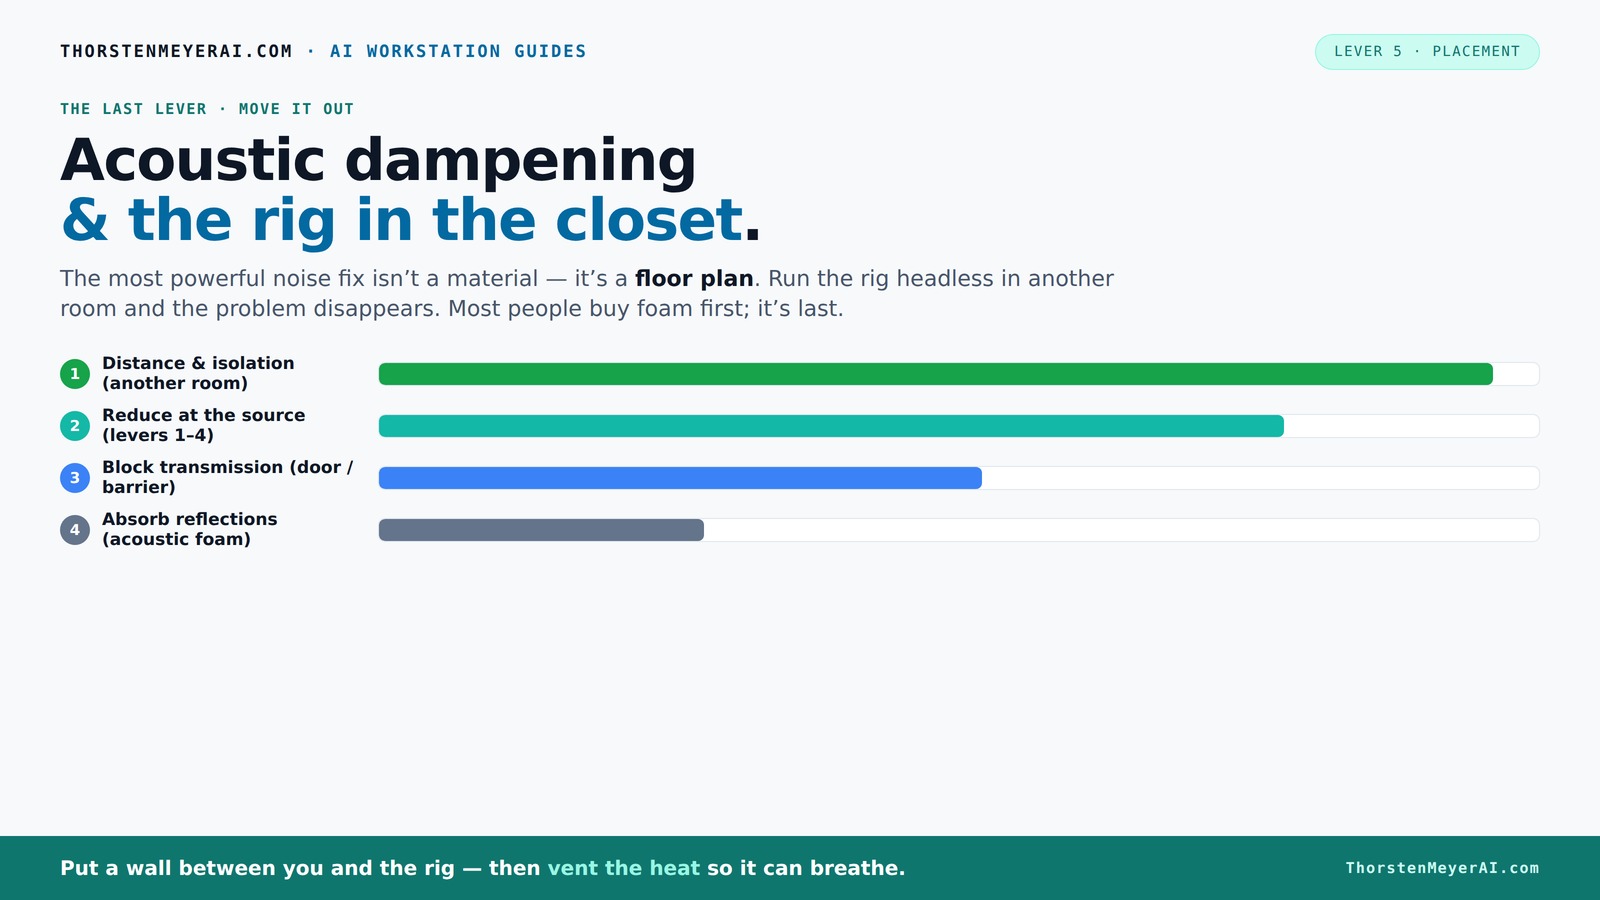
& the rig in the closet.
The most powerful noise fix isn’t a material — it’s a floor plan. A rig you can’t hear because it’s in another room beats any amount of foam. Tap the approaches in Part 1 to see what actually works.
(another room)
(levers 1–4)
(door / barrier)
(acoustic foam)
Contain the noise, not the heat
Key Takeaways
- Start with placement: moving your rig into another room or closet is the most effective noise reduction step.
- Use a combination of absorption (foam panels, blankets) and soundproofing (barriers, sealing gaps) for best results.
- Prioritize ventilation to prevent heat buildup—active exhaust fans and ducted airflow are essential in sealed spaces.
- Address reflection points—mic position, corners, and parallel surfaces—to reduce echo and boominess.
- DIY options like blankets and foam are effective and inexpensive, but always balance dampening with airflow to protect your hardware.

Focusound 52 Pack Acoustic Foam Panels 1" x 12" x 12" Sound Proof Foam Panles Soundproofing Noise Cancelling Wedge Panels for Home Office Recoding Studio with 300PCS Double-Side Adhesive
- Soundproofing Design: Triangular grooves for noise absorption
- Includes Adhesive Tape: 300pcs double-sided adhesive for easy installation
- Easy Shape Recovery: Reforms after soaking in water
As an affiliate, we earn on qualifying purchases.
As an affiliate, we earn on qualifying purchases.
Why Placement Comes First in Quieting Your Rig
The first step to a quieter setup isn’t more foam—it's where you put the rig. Moving your machine into another room, closet, or basement instantly cuts most noise from your workspace. Imagine your high-powered GPU rig living behind a door or in a closet—your desk stays silent, and you still get the work done via remote access or network. The difference is night and day: a rig in another room is often inaudible, even with no additional dampening.
For example, a researcher I know moved his GPU server into a closet on the other side of his home office. Now, he works in near silence while the rig roars in the background. This simple move saves hours of tweaking with foam or barriers, proving that distance and isolation are the most effective tools for noise control.
Why does this matter? Because reducing noise at the source or through strategic placement minimizes the need for extensive damping materials, which can be costly and complex. It also helps preserve the natural tone of your recordings or work environment, avoiding excessive dampening that can make the sound dull or muffled. The tradeoff is that moving equipment away might introduce latency or inconvenience, but for many, the quiet environment outweighs these drawbacks.
How a 'Rig in the Closet' Works — And Its One Big Tradeoff
The ‘rig in the closet’ setup is a favorite among hobbyists and professionals alike because it isolates noise without cluttering your workspace. You essentially turn a small, enclosed space into a dedicated server or vocal booth. But here’s the catch: heat. A sealed closet traps hot air, which can cause your hardware to throttle or even overheat if not managed properly.
Consider a closet with no ventilation. A 600W GPU rig running 24/7 in that space will steadily raise the temperature, risking thermal shutdowns and hardware degradation. This highlights why ventilation isn’t just a convenience but a necessity. Proper airflow—through passive vents, exhaust fans, or ducted systems—ensures hot air is expelled and fresh air circulates, maintaining optimal operating temperatures. Without this, the hardware’s performance can suffer, and lifespan can shorten, negating the benefits of noise isolation.
Choosing the right cooling method involves understanding your heat load and available space. Active cooling solutions like ducted fans or liquid cooling add complexity but significantly improve reliability. For example, a high-end inference rig benefits greatly from a combination of soundproofing and dedicated airflow paths, which prevent thermal throttling while keeping noise contained. The key takeaway: effective ventilation is as critical as acoustic treatment in a closet setup. Neglecting it can turn a quiet, well-isolated environment into a thermal nightmare, compromising both hardware longevity and performance.
For more on cooling options, check out this guide on [liquid vs. air cooling for inference rigs](https://thorstenmeyerai.com/liquid-vs-air-cooling-inference-rig/) — it highlights cooling techniques perfect for closet setups.
The Treatment Map: Where to Focus Acoustic Dampening
In a small closet, every surface influences sound. The key is addressing the most reflective points—mainly walls, ceiling, and floor—without overdoing it. Start with the first reflection points: the wall behind your mic and the wall directly opposite. Use a mirror trick to find these spots—if you can see the mic in the mirror from your position, that’s where sound bounces back.
Adding 2-inch thick panels or blankets at these points reduces harsh reflections, making your recordings clearer. But why focus here? Because these are the areas where sound waves bounce and create echoes, resulting in muddy or harsh recordings. By damping these points, you’re effectively controlling the internal acoustics, which directly impacts the clarity and warmth of your sound. Over-damping, however, can make the space sound dull and lifeless, so it’s a balance—treat the reflections but leave some room for natural sound. Corners are low-frequency trouble zones—bass traps or foam wedges help tame boomy sounds, which can otherwise muddy your recordings and make mixing more difficult. And don’t forget the floor and ceiling; rugs and ceiling panels soften the overall sound, preventing harsh reflections that can cause comb filtering or echo.
For example, a YouTuber using a closet for voice recordings placed foam panels directly behind and around the mic, plus corner traps. This targeted approach reduces problematic reflections and bass buildup, resulting in a warm, dry sound that enhances vocal clarity without overly deadening the space. The implications? Proper reflection management improves both recording quality and the listening experience, making your small space much more effective for professional-sounding output.
Materials That Make a Difference — Foam, Blankets, and More
When it comes to dampening, not all materials are created equal. Acoustic foam panels are designed to absorb mid and high frequencies, but they won’t block sound from escaping or entering. For soundproofing, you need dense mass—think blankets, mattress pads, or specialty panels. Why? Because absorption reduces echo and reverb inside a space, but soundproofing prevents sound from leaking out or in. These are different but complementary goals. In a closet, using a combination ensures you get a controlled sound environment without sacrificing ventilation.
In a closet, DIY solutions like moving blankets or foam mattress toppers can be layered over doors and walls. For example, hanging thick blankets over the door with a curtain rod creates a barrier that minimizes noise leakage. However, be aware that adding mass can also trap heat—so balance damping with airflow considerations. Using 4-inch panels offers better low-frequency absorption, especially useful if your rig emits deep vibrations or boomy bass. The tradeoff? Thicker materials can insulate heat more, so integrating active cooling methods becomes essential to prevent overheating. Check out [this guide to low-noise PC cases and airflow](https://thorstenmeyerai.com/low-noise-pc-cases-airflow/) for ideas on how to combine absorption with proper airflow, ensuring your setup remains both quiet and cool.
Limitations and How to Overcome Them: Heat, Sound, and Space
A closet setup isn’t magic. It’s a balancing act. Over-absorbing can make your space sound dull and boxy, reducing clarity and naturalness. Heat buildup is the biggest risk—without proper ventilation, your hardware could throttle or fail prematurely. The small size means sound reflections and standing waves are common, which can color your recordings or cause uneven frequency response. To counteract these issues, combine absorber panels with active cooling—like a small exhaust fan or ducted airflow—and monitor temperatures with sensors. Using water cooling or external radiators can further help manage heat, especially for high-power rigs. Adding a vented panel or a small fan with a thermostat ensures consistent temperatures, maintaining both hardware health and acoustic quality.
For instance, a streamer used a small exhaust fan with a thermostat in his closet booth. The temperature stayed below 75°F, and the noise level was dramatically reduced, proving proper ventilation is a must. Ignoring these factors can lead to hardware failures and compromised sound quality, negating the benefits of your acoustic treatments. The key is to find a balance—maximize damping without sacrificing airflow—and to continuously monitor and adjust as needed.
Frequently Asked Questions
What is the difference between acoustic dampening and soundproofing?
Acoustic dampening reduces reflections and echo inside a space, making sounds clearer and less harsh. Soundproofing blocks sound from passing through walls or barriers, preventing noise leakage outside or into other rooms. Both are important, but they serve different purposes. Dampening focuses on internal sound quality—making recordings cleaner and reducing echo—while soundproofing aims to contain or exclude sound from the environment. Understanding this helps you choose the right materials and strategies to achieve your desired outcome, whether it’s a clearer vocal recording or a quiet room.
Where should I place acoustic panels in a closet studio?
Place panels at the first reflection points—these are the spots where sound first bounces back toward your microphone. Use a mirror to identify these points: position yourself in front of your mic, hold a mirror along the wall, and move it until you see the mic in the mirror. This ensures you're damping the most problematic reflections. Additionally, treat the corners with bass traps to control low frequencies and prevent boomy sounds. Don’t forget the ceiling and floor—adding panels or rugs can soften reflections from above and below, creating a balanced acoustic environment that enhances clarity and warmth in your recordings.
How much treatment do I need for a small closet?
In small spaces, a modest amount of treatment can have a big impact. Typically, 2-inch thick panels are sufficient for mid and high frequencies, but for better low-frequency control, 4-inch panels or bass traps are recommended. Focus your treatment on reflection points and corners, as these areas influence the overall sound quality most significantly. Over-treating can dull the sound and make the space feel unnatural, so aim for a balanced approach—enough to tame reflections and bass buildup without creating a dead or overly muffled environment. The goal is to achieve a natural, clear sound suitable for recording and listening.
Do I need bass traps in a closet booth?
Yes, especially if you notice low-end issues like boomy or muddy sounds. Bass traps placed in the corners absorb low-frequency energy that tends to accumulate there, preventing standing waves and uneven frequency response. This results in a more accurate representation of your recordings and a more pleasant listening environment. Properly installed bass traps help you achieve a balanced sound, making mixing easier and improving overall audio quality in your small space.
How do I stop sound from leaking through the door and cracks?
Seal gaps around the door with weatherstripping or acoustic sealant to block sound leaks. Hanging blankets or mass-loaded curtains over the door can add mass and absorb sound, further reducing leakage. These DIY solutions are simple but effective, especially in small spaces where every decibel counts. For better results, consider installing a solid core door or adding a door sweep. Proper sealing ensures your soundproofing efforts are not compromised, maintaining a quiet environment inside your closet studio.
Conclusion
Placing your rig in a closet can turn a noisy headache into a near-silent workspace, but it’s not just about stuffing foam in corners. The real secret is thoughtful placement, effective damping, and ensuring good airflow. When you balance these elements, your setup becomes both quiet and safe.
Imagine a tiny closet, humming softly in the background, while you work undisturbed in the next room. That’s the power of smart placement and ventilation—an often overlooked combo that makes all the difference. So, take control of your space, and turn that closet into your quiet, efficient powerhouse.