
To create a DIY fabric headboard with vintage kilims, start by selecting vibrant, well-maintained pieces, measuring and trimming them precisely to fit your frame. Arrange and secure the kilims tightly onto a sturdy frame, using staples for a smooth finish. Consider adding padding for comfort and guarantee the patterns align seamlessly. For detailed steps on planning, cutting, and assembling, continue exploring the full process to craft a unique, eye-catching headboard.
Key Takeaways
- Measure your mattress and headboard area to determine the size and shape, ensuring a snug fit.
- Select vintage kilims with vibrant colors and patterns that complement your room décor.
- Carefully clean, measure, and trim the kilims to match the headboard dimensions, aligning patterns for seamless design.
- Attach the fabric to a sturdy frame using a staple gun, ensuring the fabric is stretched tight and free of wrinkles.
- Finish by trimming excess fabric, sealing edges, and adding any decorative details for a polished, personalized look.
Gathering and Preparing Your Vintage Kilims
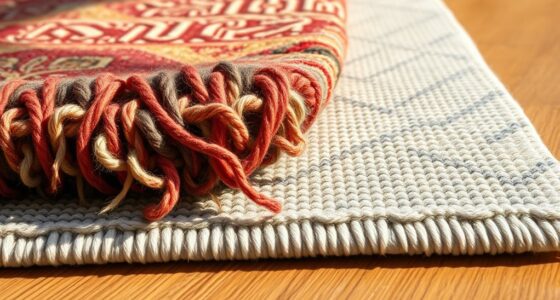
Before you start assembling your vintage kilims, you need to gather and prepare your vintage kilims. First, search for kilims with vibrant colors and interesting patterns that match your room’s style. Check for any tears, frays, or stains, and choose pieces in good condition. If necessary, gently clean each kilim with a soft brush or vacuum to remove dust and dirt. Be careful not to damage the fibers. Measure the kilims to ensure they’ll fit your headboard dimensions. If a piece is too large, trim it carefully with scissors, maintaining the pattern’s integrity. Sorting your kilims beforehand helps you visualize the final look and ensures you select the best pieces for your project. Proper preparation makes assembling easier and results in a more polished headboard. Additionally, inspecting your kilims for colorfastness ensures the dyes won’t bleed or fade over time. Checking for quality standards can help guarantee the durability of your finished headboard. Also, consider the proper storage of your kilims if you’re not working on the project immediately to prevent damage or deterioration. Furthermore, understanding the innovative materials used in modern sneaker tech can inspire creative approaches to your project, such as integrating different textiles for a unique look. Moreover, understanding the exfoliating benefits of glycolic acid can help in maintaining your skin’s health during the project.
Measuring and Planning Your Headboard Design

Start by deciding the size of your headboard to match your bed and room. Next, pick a fabric pattern that complements your decor and reflects your style. Finally, sketch your design to visualize the layout and make certain everything fits perfectly before you start building. Incorporating vintage textile styles can add a unique and authentic touch to your project.
Selecting Headboard Dimensions
To guarantee your DIY fabric headboard fits perfectly and looks proportionate, you need to carefully measure and plan its dimensions. Start by measuring your mattress’s width and height to determine the headboard’s minimum size. Decide whether you want a headboard that extends beyond the mattress for visual impact or stays flush with the sides. Consider the height—do you prefer a low, subtle design or a tall statement piece? Think about the overall proportion to your bed and room. Proper planning can also help optimize your remote work setup, making your space more functional and comfortable. Here are three key points to guide you:
- Measure your mattress for exact width and height.
- Decide on the headboard’s extension and height based on style.
- Make certain the proportions complement both your bed and your space.
Additionally, understanding headboard dimensions can ensure your design aligns with your room’s aesthetic. Considering the influence of AI on design trends can also inspire innovative ideas for customizing your headboard to match modern decor.
Choosing Fabric Pattern
Choosing the right fabric pattern is essential to achieving a cohesive and stylish headboard design. Consider the overall room decor and your personal style when selecting a pattern. If your space features neutral tones, opt for a patterned fabric that adds visual interest without overwhelming the room. Conversely, if your room already has bold colors and patterns, choose a more subdued fabric to complement the existing decor. Measure your headboard dimensions carefully to determine how much fabric you’ll need, and keep in mind the pattern’s scale—large patterns can make a big impact, while small ones add subtle texture. Aim for a pattern that enhances your room’s aesthetic and reflects your personality, creating a focal point that ties everything together. Incorporating visual harmony into your fabric choice can help create a balanced and serene environment. Paying attention to current news in Indonesia can also inspire color choices that resonate with your local surroundings and trends. Additionally, understanding marital secrets may influence your design choices if you want your space to feel more personal and private. Choosing a fabric inspired by trendy styles can further elevate your headboard’s appeal and keep your decor feeling fresh. Selecting fabrics with appropriate durability ensures your headboard remains beautiful over time, especially in high-traffic areas.
Sketching Your Design
Before you begin sketching your headboard design, it’s important to gather accurate measurements of your space and decide on the size and shape you want. This step guarantees your headboard fits perfectly and reflects your style. Take precise measurements of the wall area, bed width, and desired height. Visualize how you want your headboard to feel in the room. Considering the aesthetic style you prefer can also help guide your design choices and create a cohesive look. Additionally, understanding the shelf life of grape juice can inspire you to incorporate vintage or repurposed fabrics like kilims that add character and durability to your project. Being aware of the environmental impacts of materials can also guide you toward more sustainable choices for your headboard. Incorporating building and legal considerations ensures your project complies with any local regulations and makes the process smoother. Recognizing the benefits of eco-friendly materials can further enhance your sustainable design approach.
Cutting the Kilims to Size
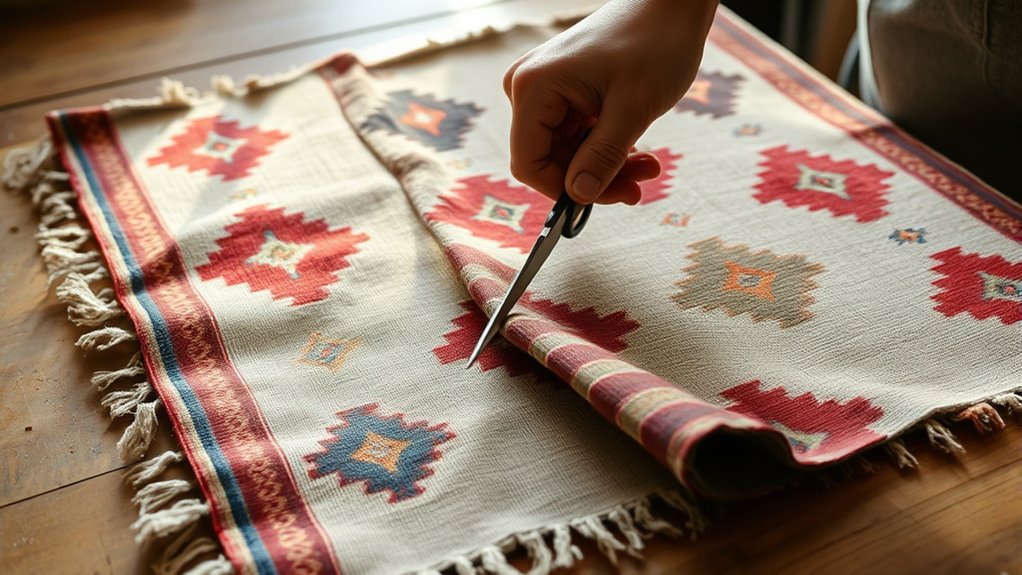
Start by measuring and marking your kilims carefully to make certain they fit your headboard dimensions. Use sharp scissors or a rotary cutter to trim the edges neatly, keeping your cuts straight and even. Don’t forget to take into account pattern alignment so the design flows seamlessly across the pieces. Utilizing professional-grade cutting tools can help achieve a clean, precise edge for a polished look. Additionally, considering self-watering plant pots can inspire creative storage or decorative solutions around your headboard setup.
Measure and Mark Precisely
To guarantee your kilims fit perfectly on your headboard, you need to measure and mark them accurately before cutting. Precise measurement ensures a clean, professional finish and prevents waste. Start by carefully measuring the height and width of your headboard, then transfer these dimensions onto your kilim with a fabric chalk or marker. Take your time to double-check each measurement—mistakes can be costly. Here are three essential tips to keep in mind:
- Use a ruler or measuring tape for accuracy to avoid uneven cuts.
- Mark clearly and boldly so lines stay visible during cutting.
- Double-check your measurements before making any cuts to prevent errors.
Following these steps ensures your kilims will fit snugly and look stunning once installed.
Trim Edges Neatly
Once you’ve marked your kilims to the correct size, it’s time to trim the edges carefully. Use sharp scissors or a rotary cutter for clean, straight cuts. Keep the fabric taut as you cut to prevent jagged edges. If your kilim has a fringe, decide whether to include or trim it for a neater look. For precise edges, consider using a ruler or straightedge as a guide. Take your time to ensure each cut is even, especially if the edges will be visible. Proper trimming not only improves the finished appearance but also helps in attaching the fabric securely to the headboard frame. Double-check your measurements before cutting again to avoid mistakes. Neat edges make the entire project look more polished and professional.
Consider Pattern Alignment
When cutting your kilims to size, paying attention to pattern alignment guarantees a cohesive and professional look. Carefully examine the design to ensure motifs flow seamlessly across the headboard. This step enhances the overall aesthetic and highlights the vintage charm of your textiles. To achieve perfect alignment, consider these tips:
- Plan your cuts by sketching the pattern layout before slicing.
- Use a clear ruler or straight edge to keep your cuts precise and straight.
- Align motifs at the edges to create a continuous visual flow.
Taking the time to match patterns not only elevates the craftsmanship but also makes your headboard a stunning statement piece. Your effort results in a polished finish that truly celebrates the beauty of vintage kilims.
Assembling the Fabric Pieces

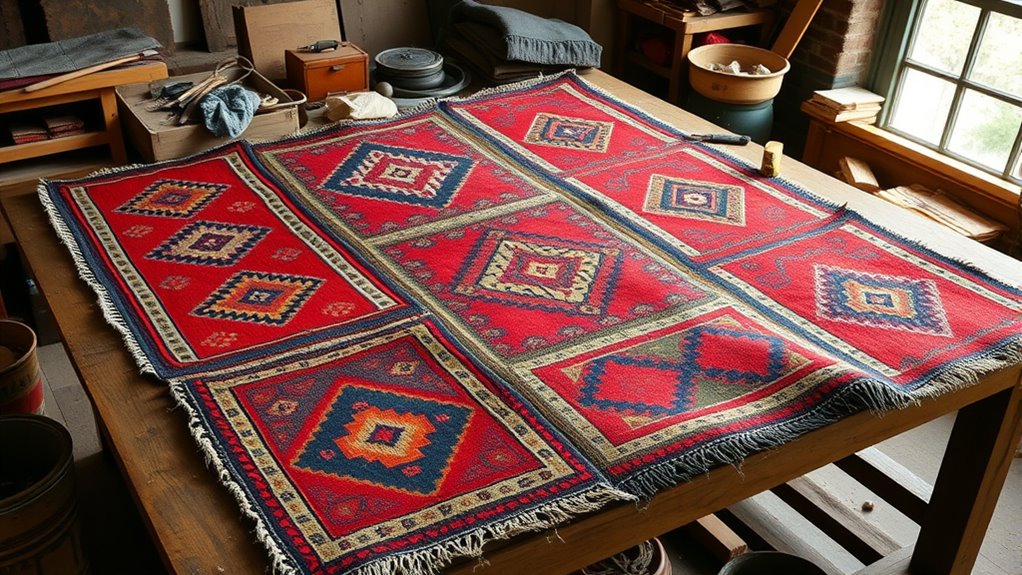
Assembling the fabric pieces is a straightforward process that brings your headboard closer to completion. Begin by laying out your vintage kilims on a flat surface, arranging them in the desired pattern. Make sure the edges are aligned and the patterns match where needed. Use a rotary cutter or sharp scissors to trim any uneven sides, guaranteeing all pieces are uniform in size. If your fabric pieces need to be joined, sew them together with a sturdy needle and thread or a sewing machine, matching the seams carefully for a clean look. Take your time to ensure the seams are straight and secure. Once all pieces are assembled and aligned, double-check the overall pattern and fit before moving on to securing the fabric to the headboard frame.
Securing the Fabric to a Headboard Frame

Are you ready to secure the fabric to your headboard frame? This step transforms your project from a fabric-covered surface to a sturdy, beautiful piece. To do it right, follow these key steps:
- Stretch the fabric tightly across the frame to avoid wrinkles and sagging, ensuring a sleek, professional look.
- Use a staple gun to attach the fabric, starting from the center of each side and working outward. Feel the satisfaction as your fabric becomes taut and perfectly aligned.
- Double-check for smoothness and make adjustments before securing the final staples. This moment of precision guarantees your headboard looks flawless and feels inviting.
With focus and care, your vintage kilim will be securely fastened, ready to elevate your bedroom decor.
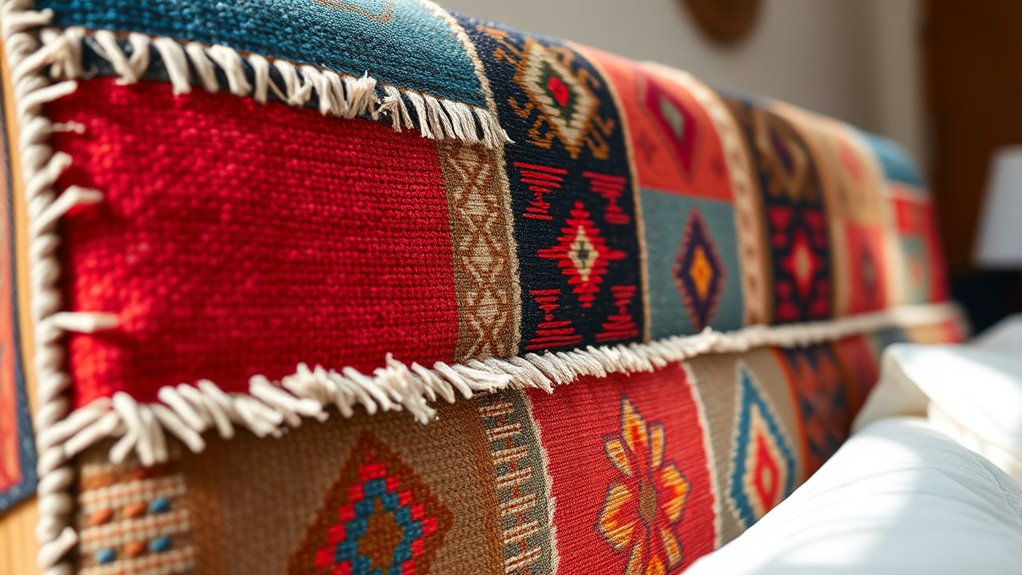
Attaching the Kilims for a Seamless Finish

To achieve a seamless finish, carefully position each kilim so the patterns align perfectly at the edges. Lay the first kilim flat against your headboard frame, smoothing out any wrinkles. When attaching the next kilim, match its pattern with the edge of the first, ensuring continuous flow. Use clips or gentle pins to hold them in place temporarily. Once aligned, sew or glue the kilims together along the edges, working slowly to maintain pattern continuity. For added stability, consider overlapping edges slightly before securing. Check frequently to make sure the patterns stay aligned as you work. This attention to detail creates a polished, unified look, making your vintage kilim headboard look professionally finished and visually seamless.
Adding Padding or Upholstery for Comfort

Adding padding or upholstery can substantially enhance the comfort of your fabric headboard. It transforms your piece from a simple decorative element into a cozy retreat. To make it inviting, consider these options:
Enhance your fabric headboard’s comfort with padding and upholstery for a cozy, stylish retreat.
- Foam Padding: Choose high-density foam for softness and support, ensuring your headboard feels plush against your back.
- Batting Layer: Wrap the foam with batting to create a smooth, cushioned surface that minimizes lumps and adds a luxurious feel.
- Upholstery Fabric: Select a soft, durable fabric that complements your decor, making your headboard both comfortable and stylish.
These steps will give your headboard a plush, inviting feel, perfect for relaxing or reading in bed. Comfort and style combine effortlessly with thoughtful padding.
Final Touches and Installing Your Headboard

Once you’ve completed the construction and upholstery of your headboard, the final step is to add any decorative touches and securely install it. First, inspect your headboard for any loose staples or uneven edges, and make any necessary adjustments. If you want, add decorative elements like tassels, trim, or paint details to enhance its look. Before mounting, measure your bed frame carefully to determine the best placement height. Use a level to ensure the headboard is straight. Secure it to the wall using appropriate brackets or anchors, making sure it’s firmly attached and stable. Double-check all fastenings and adjust as needed. With everything in place, step back and admire your handcrafted vintage kilim headboard, ready to bring character to your bedroom.
Frequently Asked Questions
Can Vintage Kilims Be Safely Washed or Cleaned Before Use?
You might wonder if vintage kilims can be safely washed or cleaned before using them. Generally, dry cleaning or gentle spot cleaning is best to preserve their colors and fibers. Avoid soaking or machine washing, as this can damage the delicate weave. Before cleaning, test a small area with a mild solution. If unsure, consult a professional to make sure you don’t harm the vintage piece.
What Tools Are Recommended for Cutting and Securing the Kilims?
When cutting and securing vintage kilims, you’ll want sharp fabric scissors or a rotary cutter for clean, precise edges. Use a cutting mat to protect surfaces and guarantee accuracy. For securing, hot glue guns or fabric adhesive work well for attaching the kilim to your headboard frame. Additionally, safety pins or upholstery tacks can help hold the fabric in place temporarily. Always handle tools carefully to avoid accidents.
How Do I Prevent the Kilims From Fading Over Time?
To prevent fading over time, you should keep your kilims out of direct sunlight, as UV rays cause colors to fade. Use a UV-protective spray specifically designed for textiles to shield the fabric. Additionally, avoid harsh cleaning agents, and gently vacuum or dust the kilims regularly. When not in use, store them in a cool, dark place to preserve their vibrant colors and extend their lifespan.
Is It Necessary to Reinforce the Headboard Frame for Heavy Kilims?
Ever wondered if you should reinforce your headboard frame for heavy fabrics? It’s definitely a smart move. Heavy kilims can put extra strain on the frame, especially over time. To avoid sagging or damage, you should strengthen the frame with sturdy materials like thicker wood or metal supports. This way, your headboard stays secure and looks great, giving you peace of mind and a stylish, durable piece.
Can This DIY Be Adapted for Different Bed Sizes Easily?
You can definitely adapt this DIY for different bed sizes easily. First, measure your bed’s dimensions, then cut your fabric or kilim accordingly, leaving extra for the edges. When attaching the fabric to the frame, make certain you adjust the size to fit snugly. This flexibility allows you to create a custom headboard that perfectly matches your bed, making the project versatile for any size.
Conclusion
Now that you’ve crafted your vintage kilim headboard, it’s time to enjoy your personalized masterpiece. Imagine waking up each morning to a unique piece of history that reflects your style. Isn’t it rewarding to turn old textiles into something new and beautiful? With your creativity and effort, you’ve created a one-of-a-kind focal point for your room. So, why settle for ordinary when you can showcase something truly meaningful and stunning?